

LM016 16x2 LCD based embedded projects using PIC16F877A

LM016 16x2 LCD based embedded projects using PIC16F877A
Published 3/2025
MP4 | Video: h264, 1280x720 | Audio: AAC, 44.1 KHz, 2 Ch
Language: English | Duration: 5h 30m | Size: 3.47 GB
Published 3/2025
MP4 | Video: h264, 1280x720 | Audio: AAC, 44.1 KHz, 2 Ch
Language: English | Duration: 5h 30m | Size: 3.47 GB
Starts from scratch to making complex projects using LM016 16x2 LCD and PIC16F877A.
What you'll learn
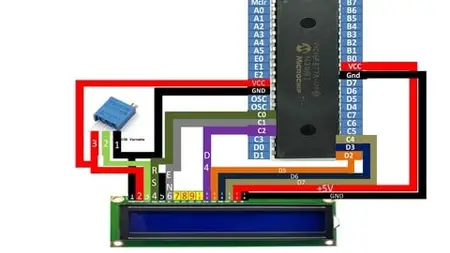
You will learn how to interface a 16x2 LM016 LCD with a PIC16F877A microcontroller.
You will learn how to wire up a 16x2 LM016 LCD with a PIC16F877A microcontroller.
You will learn how to program a LM016 16x2 LCD with a PIC16F877A microcontroller using MikroC for PIC software.
Wide range of tutorials involving LM016 16x2 LCD and PIC16F877A are provided for you to have practise.
Will be using this 16x2 LCD to display outputs from various sensors and modules and also counters and calculation data of PIC16F877A.
Requirements
Beginners are welcomed.
Description
Hello Guys, Welcome to learning microcontrollers,Course is divided into 3 sections. Section one gets you started with the PIC16F877A microcontroller from the start. Section 2 gets you the required softwares. Section 3 contains the lectures on LM016 16x2 LCD interface PIC16F877A based projects. Tutorials will allow you to go through the programming process in such away that you will be able to get the required skills to play with the LCD using MikroC for PIC compiler and to make complex projects in the future as well.Here is the course outline:Introduction to PIC16F877A.Lecture 1: Why PIC16F877A ?Lecture 2: Introduction to PIC16F877A.Lecture 3: Pins and Ports in PIC16F877A microcontroller.Lecture 4: How to use datasheet of PIC16F877A ?Download and Install MikroC for PIC and PICKIT3 programmer tool.Lecture 5: Download and Install MikroC for PIC latest version.Lecture 6: Download and Install PICKIT3 programmer tool. Setup attached as downloadables.PIC16F877A interface LM016 lectures.Lecture 7: MikroC for PIC LCD library a basic introduction and how to use.Lecture 8: Interfacing PIC16F877A microcontroller with LM016 LCD.Lecture 9: Display 2 inputs received from 2 push buttons on LM016 16x2 LCD using PIC16F877ALecture 10: Increment/decerement counter using 2 push buttons on LM016 LCD using PIC16F877A.Lecture 11: Shift text left/right on LM016 LCD using PIC16F877A.Lecture 12: Running multiple counters on 16x2 LCD LM016 using PIC16F877A.Lecture 13: LM016 16x2 LCD run 4 counters using 1 variable with PIC16F877A MCU. Method 1Lecture 14: LM016 16x2 LCD run 4 counters using 1 variable with PIC16F877A mcu. ( Method 2 )Lecture 15: LM016 16x2 LCD run 4 counters using 2 variable with PIC16F877A mcu. ( Method 2 )Lecture 16: LM016 16x2 LCD run 4 counters using 4 different variable with PIC16F877A MCU.Lecture 17: PIC16F877A interface GY-61 ADXL335 Accelerometer sensor.Lecture 18: PIC16F877A interface LM35 temp sensor. Display output in Celsius and FahrenheitLecture19 : PIC16F877A interface K-Type thermocouple using MAX 6675 module.
Who this course is for
Electronic students, electronic hobbyist and anyone with an intrest of making projects using GSM modules and microcontrollers.