

Realism Masterclass: Realistic Digital Art

Realism Masterclass: Realistic Digital Art
Published 6/2022
MP4 | Video: h264, 1280x720 | Audio: AAC, 44.1 KHz
Language: English | Size: 5.73 GB | Duration: 4h 40m
Published 6/2022
MP4 | Video: h264, 1280x720 | Audio: AAC, 44.1 KHz
Language: English | Size: 5.73 GB | Duration: 4h 40m
Realistic digital art: draw realistic images digitally with your drawing software (Procreate, Photoshop,…)
What you'll learn
How to create digitally realistic images
Photo analysis
Creation of sketch
Difference between Greyscale and Colour
Application of shades of gray and colors
Set shadows correctly
The effective elaboration of your image
Recognize highlights and set them correctly
Requirements
You will need drawing software. In the course we will use Procreate on the iPad. But you can also apply the design principles in any other software.
You don't need any previous knowledge and can start immediately.
Description
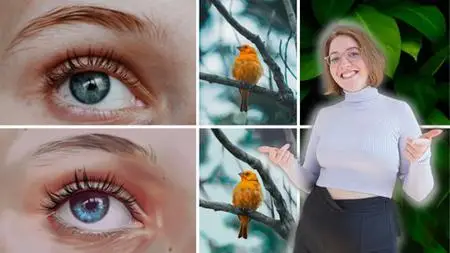
Do you also wish you could create realistic images on the iPad? Do you want to fully understand realism in images in a practical way?Then this course is for you!In this course you will learn everything about the following topics: Analyzing the photo, creating a sketch, the difference between greyscale and color, using grayscale and color, setting shadows correctly, working out your image effectively, recognizing and setting highlights correctly.You get instant access to:Detailed & hands-on video lessons to follow along with your work12 helpful materials to get the most out of your learning, downloadable to practice anywhereAccess to the Procreate Community. Exchange with all course membersTips from (full-time) illustrator WenckeLifetime access to the course and all future updatesBut what will you learn in detail in this course?Sketching: First of all, you will learn to analyze a real photo (in this case a plant) correctly in order to be able to implement everything realistically in your drawing afterwards. When you have finished analyzing the photo, you will start drawing the sketch. How important is the sketch anyway? At the end of this section you will have a finished sketch.Color or grayscale: What are the differences between "greyscale" and "color blocking"? Both terms will be covered in detail and you will understand the use of greyscale and color after completing this section. Setting shadows: If you look closely at the plant image, you will notice many small and large shadows that add depth to the photo. This is exactly what you want to do in your drawing. In this section you will learn how to do this and what you need to keep in mind.Elaboration of the image: So far you have your plant in black and white. We want to change that in the penultimate section of the first project by converting the greyscale to color. In addition, you'll now get rid of the sketch and start effectively working out your image. Add realism with highlights: As the name of the section suggests, you now add the final touch to your image. You can add realism to your image with light reflections and other smaller highlights. Add blur: In photography, you often work with depth of field, which is something we want to implement in our drawing, of course. Therefore, in the last section of the project "Plant" you set the appropriate blur in the background to complete the realism. The last two sections:You've gone through all the steps in the previous lessons to create as realistic a result as possible, and hopefully you now have a realistic-looking plant in front of you. To deepen the whole thing again and also use other motifs we decided to draw a bird and a human eye and repeat the steps basically. Of course, with both bonus motifs you have to pay more attention to the proportions, which was rather secondary with the plant. Feel free to check out the free course preview to see for yourself the quality of the course. Do you need Procreate?Wencke shows you all the things taught in this course on the iPad using the Procreate app. Of course, you can also use the design principles in any other digital drawing software. This course does not cover how to use Procreate properly. For that we have created a great masterclass, which you can find on our instructor profile. You can also use any other drawing software. Our Satisfaction Guarantee We have a 30 day 100% money back guarantee. So if you are not satisfied with your purchase, you will get all your money back immediately!We look forward to welcoming you to the first lesson of the course!Wencke & Marius
Overview
Section 1: Introduction
Lecture 1 Introduction & Overview
Lecture 2 How to use this course and what will I learn?
Section 2: The sketch
Lecture 3 Analysing the picture / Preparation
Lecture 4 How important is the sketch
Lecture 5 Making the sketch
Section 3: Colour or greyscale?
Lecture 6 The difference between colour blocking and greyscale
Lecture 7 Using greyscale
Lecture 8 Using colour blocking
Section 4: Blocking in shadows
Lecture 9 Blocking in shadows and creating depth (greyscale)
Lecture 10 Blocking in shadows and creating depth (colour)
Section 5: Rendering of the image
Lecture 11 Turning greyscale to colour
Lecture 12 Getting rid of the sketch
Lecture 13 Effective rendering
Lecture 14 Effective rendering Part2
Section 6: Creating realism with highlights
Lecture 15 Spotting higlights and placing them right
Section 7: Placing the blur
Lecture 16 Blurring as a tool for realism
Section 8: Example bird
Lecture 17 Timelapse bird
Lecture 18 Bird part1
Lecture 19 Bird part2
Lecture 20 Bird part3
Section 9: Example eye
Lecture 21 Timelapse eye
Lecture 22 Eye part1
Lecture 23 Eye part2
Lecture 24 Eye part3
Beginners who want to bring realism into their pictures,Advanced students who want to learn from a real professional