


Learners Guide To 3D Character Creation Vol 1: Zbrush 2021
Learners Guide To 3D Character Creation Vol 1: Zbrush 2021
Last updated 3/2021
MP4 | Video: h264, 1280x720 | Audio: AAC, 44.1 KHz
Language: English | Size: 46.92 GB | Duration: 47h 3m
Last updated 3/2021
MP4 | Video: h264, 1280x720 | Audio: AAC, 44.1 KHz
Language: English | Size: 46.92 GB | Duration: 47h 3m
A Course for All levels in Learning How to Create 3D Characters, by Sculpting and Retopologizing through Zbrush 2021
What you'll learn
Learning to sculpt 3D Characters in Zbrush 2021 with 2D or 3D reference aids in split screen workflow
Requirements
Either a Free demo or copy of Zbrush 2021
(Optional but recommended ) Wacom Tablet
Description
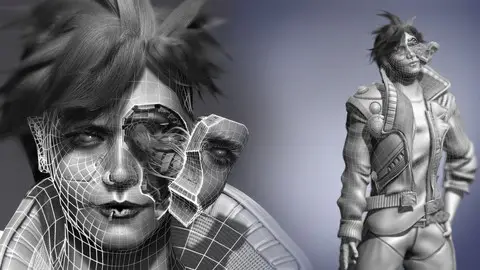
Hello and Welcome to Learners Guide to 3D Character Creation Vol 1: Zbrush & Retopology A new course dedicated to teaching how to sculpt, retopologize, 3D Characters all within Zbrush!Here not only are we focused on teaching you how to make 3D characters but also give emphasis through the course in "practicing" your skills as a sculptor OR beginner sculptor when creating 3D characters, therefore we chose a fun character theme challenge : The Cyberpunk Hacker! To that end, we crafted a course that will deliver 2 new unique approaches in teaching character creation by affording you the opportunity to sculpt through Split Screen Mode OR Multiple 2D Orthographic References - Split Screen Mode was introduced back in Zbrush version 2019.1 which has become more of a updated method of practicing your sculpting techniques geared toward the beginner but also intermediate users who are interested. This is where we the instructors break up our character into sections of decimated meshes and demonstrate how they would be imported into your zbrush file. Next we go over the basics of how to turn on split screen mode in your Zbrush viewport to have 2 screens, our mesh on the left and your mesh on the right! From there you interactively work with us when we sculpt this character out! ( checkout our the promotional video above right corner for demonstration in what to expect). - Multiple 2D Orthographic References - Of course for more intermediate to advance users don't need to take Split Screen Mode approach, alternatively we will be providing you multiple 2D orthographic references of the character in many of the areas to help aid in your sculpting process as we guide you in the sculpting of this character course.Feel free to learn through either approach OR a combinations of both!What we will teachZBRUSH CHARACTER SCULPTING: - A quick section breakdown to the basics of Zbrush for the beginner so no one gets left behind before we start. - How to create your own base mesh from scratch. (In addition we will be supplying you our own course learning base mesh for you to use as a bonus option) - How to pull clothing off of a blank base mesh to sculpt full body clothing of a Cyberpunk Character as is done commonly in the industry pipeline. - Illustrate how to create seams utilizing fun combinations such as group loops with masking - Learn to craft hair within Zbrush through it's built in hair system Fibermesh, and demonstrate several methods to apply the hair upon the meshRETOPOLOGIZING: - Learn several methods of retopologizing (process of creating Low Rez 3D models from High Rez sculpted meshes) Those methods below are: 1. The first is: Is an auto retopologizing approach with Zremesher 3.0 utilizing the Zremesher Guides Lines Brush as a method of directing clean edge flow. 2. The second method is a manual retopologizing approach where we use Zmodelers 3D modeling tool Edge Extrusion to provide more flexible option in 3D Character Modeling, over a finished High Rez sculpt.- (Disclaimer - this course is a 2 part course series with this first course being the focus of 3D character sculpting, retopologizing a character into a low rez character model as a primary focus of curriculum. The upcoming second course focuses more to UVing, texturing and rendering)
Overview
Section 1: Section 1: What to Expect
Lecture 1 What To Expect
Section 2: Section 2: Zbrush Intro and Basics
Lecture 2 Introduction To Zbrush
Lecture 3 UI Breakdown
Lecture 4 Masking And Grouploops
Lecture 5 Secondary Sculpting Tools
Lecture 6 Spacebar Trick
Lecture 7 Creating Customized UI Pop Up Menu
Lecture 8 Practice Session 1: Base Mesh Creation
Lecture 9 Practice Session 2: Base Mesh Creation
Lecture 10 Practice Session 3: Base Mesh Creation
Lecture 11 Practice Session 4: Base Mesh Creation
Lecture 12 Practice Session 5: Base Mesh Creation
Section 3: Section 3 Getting Started & Blocking Out
Lecture 13 Lesson 1: Setting up with Provided References
Lecture 14 Lesson 2: Extracting out Primary Fabric Base Meshes
Section 4: Sculpting Shirt
Lecture 15 Lesson 3: Cleaning up Shirt Extraction for Wrinkle Sculpting
Lecture 16 Lesson 4: Sculpting Wrinkles
Section 5: Sculpting Pants
Lecture 17 Lesson 5: Cleaning Up Base Mesh
Lecture 18 Lesson 6: Sculpting Wrinkles with Additional Brushes
Lecture 19 Lesson 7: Seam Sculpting Through Panel Loops
Lecture 20 Lesson 8 Secondary Blockout
Lecture 21 Lesson 9 Detailing Side
Lecture 22 Lesson 10: Pant Trims
Section 6: Sculpting Jacket
Lecture 23 Lesson 11 Cleaning Up Base Mesh Jacket
Lecture 24 Lesson 12 Separate Apparels
Lecture 25 Lesson 13 Separate Apparels Part 2
Lecture 26 Lesson 14 Separate Apparels Part 3
Lecture 27 Lesson 15 Creating and Collar Base Mesh Through Live Booleans
Lecture 28 Lesson 16 Creating Neck Collar Base Mesh with Bend Curves
Lecture 29 Lesson 17 Creating Sash by Combining Dynamesh and ZRemesher
Lecture 30 Lesson 18 Detachable Piece Placemets Part 1
Lecture 31 Lesson 19 Detachable Piece Placemets Part 2
Lecture 32 Lesson 20 Wrinkle Sculpting
Lecture 33 Lesson 21 Cleaning up and Adjusting Part 1
Lecture 34 Lesson 22 Cleaning up and Adjusting Part 2
Lecture 35 Lesson 23 Creating Pads Strips
Lecture 36 Lesson 24 Creating Front Overlay
Lecture 37 Lesson 25 Creating Collar
Lecture 38 Lesson 26 Creating Base Mesh Shoulder
Lecture 39 Lesson 27 Creating Nodules
Lecture 40 Lesson 28 Creating Sash 1
Lecture 41 Lesson 29 Creating Sash 2
Lecture 42 Lesson 30 Creating Sash 3
Section 7: Sculpting Belt & Shoes / Clean Up
Lecture 43 Lesson 31 Clean Up and Belt Block Out
Lecture 44 Lesson 32 Belt Detailing 1
Lecture 45 Lesson 33 Belt Detailing 2
Lecture 46 Lesson 34 Shoe BLock Out
Lecture 47 Lesson 35 Shoe Detailing 1
Lecture 48 Lesson 36 Shoe Detailing 2
Section 8: Sculpting Head
Lecture 49 Faces Breakdown
Lecture 50 Lesson 37 Setting up Head Reference
Lecture 51 Lesson 38 Blocking Out Eyes
Lecture 52 Lesson 39 Eyes Refinement
Lecture 53 Lesson 40 Blocking Out Nose
Lecture 54 Lesson 41 Blocking Out Mouth
Lecture 55 Lesson 42 Detailing Mouth
Lecture 56 Lesson 43 Blocking Out Ear
Lecture 57 Lesson 44 Blocking Out Ear 2
Lecture 58 Lesson 45 Eye and Ear Refinement
Lecture 59 Lesson 46 Eyelashes and Eye Shape
Lecture 60 Lesson 47 Skin Pores and Painting Ghost Eyes
Section 9: Creating Detachable Face
Lecture 61 Lesson 48 Creating Face Cavity
Lecture 62 Lesson 49 Creating Detachable Face
Lecture 63 Lesson 50 Detachable Face Back Side
Lecture 64 Lesson 51 Detachable Face Detailing Thickness
Lecture 65 Lesson 52 Detachable Face Creating Wires Part 1
Lecture 66 Lesson 53 Detachable Face Creating Wires Part 2
Lecture 67 Lesson 54 Detachable Face Placement
Lecture 68 Lesson 55 Detachable Face Fine Wires
Section 10: Hair Creation with Fibermesh
Lecture 69 Lesson 56 Base Mesh Hair Part 1 Stroke Modification
Lecture 70 Lesson 57 Base Mesh Hair Part 2 Application of Base Mesh Tubes
Lecture 71 Lesson 58 Fibermesh Basics
Lecture 72 Lesson 59 Hair_Strand Construction
Lecture 73 Lesson 60 Hair Strand Application Break Down
Lecture 74 Lesson 61 Hair Strand Application Front
Lecture 75 Lesson 62 Hair Mid_Section
Lecture 76 Lesson 63 Hair Mid_Section Part 2
Lecture 77 Lesson 64 Hair End Section
Lecture 78 Lesson 65 Side Hair
Lecture 79 Lesson 66 Bonus Detailing
Section 11: Retopologizing
Lecture 80 Retopologizing What To Expect
Lecture 81 Lesson 67 Retopologizing Shirt
Lecture 82 Lesson 68 Retopologize Pant Trims
Lecture 83 Lesson 69 Retopologize Pants Part 1
Lecture 84 Lesson 70 Retopologize Pants Part 2
Lecture 85 Lesson 71 Retopologize Pants Part 3
Lecture 86 Lesson 72 Organizing Jacket For Retopology
Lecture 87 Lesson 73 Jacket Retopology
Lecture 88 Lesson 74 Jacket Retopology 2
Lecture 89 Lesson 75 Jacket Retopology 3
Lecture 90 Lesson 76 Jacket Retopology 4
Lecture 91 Lesson 77 Jacket Retopology 5
Lecture 92 Lesson 78 Shoulder Armor
Lecture 93 Lesson 79 Shoulder Armor 2
Lecture 94 Lesson 80 Shoulder Armor 3
Lecture 95 Lesson 81 Trim Pads_Retoopo
Lecture 96 Lesson 82 Jacket Trim
Lecture 97 Lesson 83 Jacket Discs
Lecture 98 Lesson 84 Shoulder Nodules
Lecture 99 Lesson 85 Jacket_Fold
Lecture 100 Lesson 86 Collar_1
Lecture 101 Lesson 87 Collar_2
Lecture 102 Lesson 88 Sash
Lecture 103 Lesson 89 zipper
Lecture 104 Lesson 90 Main_belt
Lecture 105 Lesson 91 Belt Pieces
Lecture 106 Lesson 92 Shoe Pieces
Lecture 107 Lesson 93 Shoe Main
Lecture 108 Lesson 94 Shoe Soles
Lecture 109 Lesson 95 Hands Part 1
Lecture 110 Lesson 96 Hands Part 2
Lecture 111 Lesson 97 Hands Part 3
Lecture 112 Lesson 98 Hands Part 4
Lecture 113 Lesson 99 Shins
Lecture 114 Lesson 100 Face_Retopology Eyes
Lecture 115 Lesson 101 Face_Retopology Nose
Lecture 116 Lesson 102 Face_Retopology Mouth
Lecture 117 Lesson 103 Face_Retopology Ear 1
Lecture 118 Lesson 104 Face_Retopology Ear 2
Lecture 119 Lesson 105 Face_Retopology Connecting
Lecture 120 Lesson 106 Face_Retopology Connecting 2
Lecture 121 Lesson 107 Face_Retopology Connecting 3
Lecture 122 Lesson 108 Face_Retopology Connecting 4
Lecture 123 Lesson 109 Face_Retopology Neck
Lecture 124 Lesson 110 Face_Retopology Cleanup
Lecture 125 Lesson 111 Face_Retopology Cleanup 2
Lecture 126 Lesson 112 Eyes
Lecture 127 Lesson 113 Retopolgizing Wires
Lecture 128 Lesson 114 Retopolgizing Segments
Lecture 129 Lesson 115 Retopolgizing Slug Tube
Lecture 130 Lesson 116 Retopolgizing Detachable Face
Lecture 131 Lesson 117 Retopolgizing Detachable Face 2
Lecture 132 Lesson 118 RetopolgizinG Back Piece
Section 12: Exporting Mesh and Posing Character
Lecture 133 Lesson 119 Exporting High Rez
Lecture 134 Lesson 120 Exporting Low Rez & UVS
Lecture 135 Lesson 121 Posing_Character
Lecture 136 Bonus Rendering Part 1
Lecture 137 Bonus Rendering Part 2
Anyone who wants to learn how to create 3D Characters