

Practical Sci-Fi Design

Practical Sci-Fi Design
Published 9/2023
MP4 | Video: h264, 1280x720 | Audio: AAC, 44.1 KHz
Language: English | Size: 24.76 GB | Duration: 28h 41m
Published 9/2023
MP4 | Video: h264, 1280x720 | Audio: AAC, 44.1 KHz
Language: English | Size: 24.76 GB | Duration: 28h 41m
Improve your sci-fi designs with Arrimus 3D's principles of design and decision-making using Max and Plasticity.
What you'll learn
Learn to use 3DS Max at a high level for sci-fi asset creation.
Learn to use Plasticity at a high level for sci-fi asset creation.
Learn the design principles and decisions that I think about when creating sci-fi assets.
Take modern objects and redesign them into nice-looking sci-fi assets.
Requirements
This course is suitable for complete beginners who have access to Plasticity and Max. Other poly-modeling packages can be used.
Description
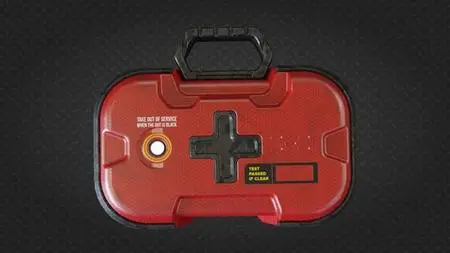
Fast. Fun. Dynamic. Practical. Easy-to-grasp. Are you a beginner or intermediate 3D artist who is interested in sci-fi design? Are you interested in a course that guides your hand and takes you step-by-step through a series of gradually more complex designs until you are confident in making anything you want? If you are then this course is for you! I designed this course to introduce design in a cohesive and practical way, by taking real life objects and giving them a sci-fi twist! We will take objects like thermoses, crates, shovels, helmets, concrete barriers, medkits, glasses, traffic cones, coolers, game consoles, and more and turn them into sleek sci-fi props. You will become proficient in 3D Studio Max, V-Ray, and Plasticity and learn some great techniques for fast design such as the auto-crease workflow for Max. To sweeten the deal, in addition to modeling, you will also learn how to create procedural materials in V-Ray so you can add complex detail and damage and grime to your models right away without having to worry about unwrapping UVs or going into Substance Painter. V-Ray decals are used extensively so you can add stickers and logos quickly by just placing the decal object on your model. You will also learn how to easily render and add post-processing effects, volume lights, and lens effects directly in Max without having to go into Photoshop or any other program. Max and V-Ray have all that you need! This course will continue to get updates for months to come so be sure to visit often to see the new content and stay tuned for updates on my Youtube channel: Arrimus3D.
Overview
Section 1: Introduction
Lecture 1 Soda Can
Lecture 2 5 Steps to Design
Lecture 3 Experiment After Finishing a Design
Lecture 4 General Tips - Part 1
Lecture 5 Border Principle
Lecture 6 Thermos - Part 1
Lecture 7 Thermos - Part 2
Lecture 8 Wall Lever
Lecture 9 Traffic Cone - Part 1
Lecture 10 Traffic Cone - Part 2
Lecture 11 Medkit - Part 1
Lecture 12 Medkit - Part 2
Lecture 13 Medkit - Part 3
Lecture 14 Medkit - Part 4
Lecture 15 Medkit - Part 5
Lecture 16 Medkit - Part 6
Lecture 17 Game Console - Part 1
Lecture 18 Game Console - Part 2
Lecture 19 Thermal Shovel - Part 1
Lecture 20 Thermal Shovel - Part 2
Lecture 21 Thermal Shovel - Part 3
Lecture 22 Cooler - Part 1
Lecture 23 Cooler - Part 2
Lecture 24 Concrete Barrier - Part 1
Lecture 25 Concrete Barrier - Part 2
Lecture 26 Laptop - Part 1
Lecture 27 Glasses
Lecture 28 Propane Tank
Lecture 29 Kitbashing and Mechanical Arm - Part 1
Lecture 30 Kitbashing and Mechanical Arm - Part 2
Lecture 31 Kitbashing and Mechanical Arm - Part 3
Lecture 32 Helmet - Part 1
Lecture 33 Helmet - Part 2
Lecture 34 Helmet - Part 3
Lecture 35 Helmet - Part 4
Lecture 36 Helmet - Part 5
Lecture 37 Helmet - Part 6
Section 2: V-Ray Rendering
Lecture 38 V-Ray - Part 1 - Glasses
Lecture 39 V-Ray - Part 2 - Decals
Lecture 40 V-Ray - Part 4 - Cooler 2
Lecture 41 V-Ray - Part 5 - Traffic Cone 1
Lecture 42 V-Ray - Part 6 - Traffic Cone 2
Lecture 43 V-Ray - Part 7 - Thermos
Lecture 44 V-Ray - Part 8 - Concrete Barrier
Lecture 45 V-Ray - Part 9 - Medkit
New and intermediate modelers and designers who want to improve their designs in polygon and CAD applications.