

Part 2 Pen Segmenting With Basic Tools And Jigs

Part 2 Pen Segmenting With Basic Tools And Jigs
Published 8/2024
MP4 | Video: h264, 1920x1080 | Audio: AAC, 44.1 KHz
Language: English | Size: 6.68 GB | Duration: 2h 39m
Published 8/2024
MP4 | Video: h264, 1920x1080 | Audio: AAC, 44.1 KHz
Language: English | Size: 6.68 GB | Duration: 2h 39m
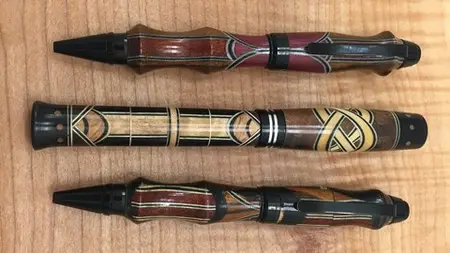
In this video I am using Cigar/Churchill Pen Kits for the 3 Pens
What you'll learn
We are Making three Pens in the video, First Pen Segmented Offcuts
Second Pen T Shirt Pen is made using the Drill Press Jig
How to use the Table Saw Jig
V Block Jig
Third Pen Cutting and Making Advanced Segmented Pen Blanks
Requirements
Tools needed: Table Saw, Drill Press, Mini Band Saw, Mini Lathe
Basic understanding of woodworking tools, making jigs, pen turning
Description
Creating your own segmented pen is a fulfilling endeavor that allows you to combine creativity with craftsmanship. Imagine using exotic woods and dyed veneers to create a unique, personalized pen that stands out. In this video, I am utilizing Cigar Pen Kits and a Churchill Kit, both known for their robust and stylish designs, as the foundation for these beautiful writing instruments.To bring these pens to life, I am employing a variety of basic tools and jigs. The primary tools include a Table Saw, Drill Press, Mini Band Saw, and Mini Lathe. Each tool plays a crucial role in the pen-making process, ensuring precision and quality in every step.For the first pen, I am using segmented offcuts from previous pens that were made with the Drill Press Jig. These offcuts are then cast in black resin, creating a stunning contrast between the wood and the resin, resulting in a pen with unique character and flair.The second pen is crafted using a Drill Press Jig, which is particularly useful for drilling out scallops with a Hole Saw. This jig ensures that the scallops are perfectly aligned on all four sides. Instead of using wood veneers to separate the segments, we are using inexpensive T-shirt material. This alternative material adds a distinctive texture and appearance to the pen, showcasing the versatility of pen segmenting.The third pen we are creating features a Celtic Knot design, along with stepped and solid scallops. This pen introduces a couple of new jigs, including one designed to cut wood veneer holes and a V Block jig necessary for creating the Maple Dots in the cap and body. These intricate designs require precision and patience, but the results are well worth the effort, producing a pen that is both elegant and complex.Throughout the video, I demonstrate how to use these jigs effectively, providing tips and techniques to achieve the best results. By the end of this segment, you will have a comprehensive understanding of how to segment pens using Part 2 of basic tools and jigs. You'll be ready to start creating your own custom pens with confidence and precision, expanding your skills and creativity in the art of pen-making.
Overview
Section 1: Introduction
Lecture 1 Introduction
Section 2: Drill Press Segmented Off Cut Resin Pen
Lecture 2 Drill Press Segmented Off Cut Resin Pen
Section 3: T Shirt Drill Press Segmented Pen Blank
Lecture 3 T Shirt Drill Press Segmented Pen Blank
Section 4: Drill, Turn, Finish T Shirt Pen Blank
Lecture 4 Drill, Turn, Finish T Shirt Pen Blank
Section 5: Celtic Knot on Table Saw
Lecture 5 Celtic Knot on Table Saw
Section 6: Cap and Body, Table Saw Step Scallops
Lecture 6 Cap and Body, Table Saw Step Scallops
Section 7: Veneer Hole Cutting Jig
Lecture 7 Veneer Hole Cutting Jig
Section 8: V Block Jig, Turn, Finish 3rd Pen
Lecture 8 V Block Jig, Turn, Finish 3rd Pen
Woodworkers/Pen Turners interested in Pen Segmenting