

Create And Animate A Vehicle In Blender & Substance Painter

Create And Animate A Vehicle In Blender & Substance Painter
Published 6/2023
MP4 | Video: h264, 1280x720 | Audio: AAC, 44.1 KHz
Language: English | Size: 13.14 GB | Duration: 13h 58m
Published 6/2023
MP4 | Video: h264, 1280x720 | Audio: AAC, 44.1 KHz
Language: English | Size: 13.14 GB | Duration: 13h 58m
Learn Blender and Substance Painter while modeling and animating a realistic vehicle.
What you'll learn
3D Modeling in Blender
UV Mapping complex 3D objects
Texturing 3D models with Adobe Substance Painter
Rigging and animating a vehicle in Blender
Rendering an animation in Blender
Requirements
A graphics tablet is used during the texturing section, but it is not necessary. A mouse can be used as well.
Description
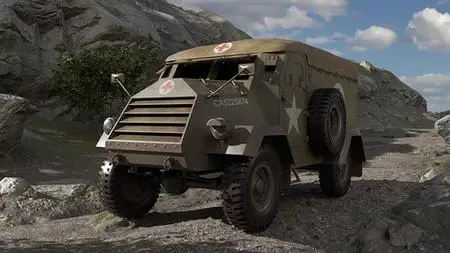
Hi, welcome to this course where we will Create and Animate a Vehicle in Blender and Substance Painter. We’re going to create a World War II-era Canadian Ambulance. And we’ll begin with preparing our reference images in Krita, and then taking them into Blender and setting them up in the 3D Viewport.We’ll then start blocking in the basic shapes to get a sense of the size and proportion of the various pieces, and how they should fit together. As we refine the model, you’ll learn about Blender’s modeling tools and modifiers, how to stay organized during a large project, and how to plan ahead for rigging and animating the vehicle.You’ll also learn how to prepare a model in Blender for texturing in Adobe Substance Painter. We’ll go over how to use materials to organize your texture sets, how to bake maps in Substance Painter, and how to use masks and generators to add dirt and wear to your models. We’ll then go over how to configure and export texture maps from Substance Painter and how to apply them to your model in Blender.Now we’re ready to start animating our vehicle. But first we need to rig the truck. We will use the free Blender add-on, Rigacar, to create a vehicle rig, configure the suspension, and animate it across a rugged terrain. Once the animation is complete, you’ll learn how to render out an image sequence of the scene, as well as a final .mp4 video file.This course will take you from start to finish, creating an animated scene of a vehicle in an environment. The tools and skills you’ll learn in this course will allow you to take that next step of creating your own amazing animated scenes.So join me! Learn Blender while creating this realistic vehicle and animating it through a rugged terrain. This kind of project is always a lot of fun. It’s got lots of room for customization along the way. But by the end, you'll understand everything you need to know to make your own incredible animations!
Overview
Section 1: Introduction
Lecture 1 Course Overview
Lecture 2 Preparing Reference Images in Krita
Lecture 3 Reference Images in Blender
Section 2: Modeling the Vehicle
Lecture 4 Beginning the Basic Shapes
Lecture 5 Blocking in the Complex Angles
Lecture 6 Extruding the Back of the Truck
Lecture 7 Adding the Fenders
Lecture 8 Creating the Front Wheel Wells
Lecture 9 Closing Up the Front
Lecture 10 Adding the Top of the Vehicle
Lecture 11 Creating the Side Doors
Lecture 12 Beginning the Side Window
Lecture 13 Refining the Door Hinges
Lecture 14 Modeling the Door Handles
Lecture 15 Modeling the Grill Frame
Lecture 16 Finishing the Grill
Lecture 17 Beginning the Rear Doors
Lecture 18 Beginning the Headlights
Lecture 19 Continuing the Headlight
Lecture 20 Finishing the Headlights
Lecture 21 The Bisect and Shear Tools
Lecture 22 Beginning the Front Shield Panels
Lecture 23 Finishing the Front Shields
Lecture 24 Adding the Small Window Shields
Lecture 25 Fixes, Clean-up, and Organization
Lecture 26 Beginning the Tires and Wheels
Lecture 27 Adding the Bolts to the Wheel
Lecture 28 Finishing the Wheels
Lecture 29 Beginning the Tire Treads
Lecture 30 Finishing the Tire Treads
Lecture 31 Modeling the Rear Ladder
Lecture 32 Creating the Rear Bumper
Lecture 33 Beginning the Rear View Mirrors
Lecture 34 Finishing the Rearview Mirrors
Lecture 35 Finishing the Rearview Mirrors
Lecture 36 Creating the Circular Hooks
Lecture 37 Beginning the Undercarriage
Lecture 38 Modeling the Front Axle
Lecture 39 Adding Details to the Axle
Lecture 40 Continuing Work on the Axles
Lecture 41 Adding Details to the Undercarriage
Lecture 42 Finishing the Undercarriage
Lecture 43 Face Orientation and Fitting Pieces Together
Lecture 44 Modeling the Inner Walls
Lecture 45 Modeling the Seats
Lecture 46 Creating the Gear Shift and Parking Brake
Lecture 47 Modeling the Steering Wheel
Lecture 48 Modeling the Dash Board
Lecture 49 Finishing the Interior
Lecture 50 Creating the Tarp Hooks
Lecture 51 Adding Ropes to the Tarp
Lecture 52 Adding More Details
Lecture 53 Creating the Mudflaps and Hood Cover
Lecture 54 Modeling the Hood Hinges
Lecture 55 Finishing the Hood Clamps
Section 3: UV Mapping the Vehicle
Lecture 56 Using Smart UV Project
Lecture 57 Using the Unwrap Tool
Lecture 58 Using a UV Test Pattern
Lecture 59 UV Mapping the Grill and Doors
Lecture 60 Continuing the UV Mapping
Lecture 61 UV Mapping the Exterior Body
Lecture 62 UV Mapping and Face Orientation
Lecture 63 Finishing the UV Mapping
Section 4: Exporting the Model and Baking Texture Maps
Lecture 64 Preparing the Model for Export
Lecture 65 Continuing the Material Set-up
Lecture 66 Exporting to Substance Painter
Lecture 67 Fixing UV Issues in Blender
Lecture 68 Using the Project Configuration Tool
Section 5: Texturing in Substance Painter
Lecture 69 Beginning the Base Materials
Lecture 70 Polygon Fill and Triplanar Projection
Lecture 71 Tires, Roof, and Mirrors
Lecture 72 Texturing the Interior
Lecture 73 Texturing the Undercarriage and Ladder
Lecture 74 Finishing the Base Materials
Lecture 75 Fixing UV Issues in Blender
Lecture 76 Updating Changes in Substance Painter
Lecture 77 Beginning to Paint the Dirt
Lecture 78 Continuing to Paint the Dirt Layers
Lecture 79 Painting Height and Bump Information
Lecture 80 Adding Decals to the Vehicle
Lecture 81 Texturing the Headlights
Lecture 82 Exporting Textures Maps from Substance Painter
Lecture 83 Applying the Textures in Blender
Section 6: Rigging and Animating the Vehicle
Lecture 84 Setting up the Vehicle for Rigging
Lecture 85 Car Rigging and Render Settings
Lecture 86 Animating the Vehicle
Lecture 87 Rendering the Animation
Lecture 88 Adjusting the Suspension and Animating the Camera
Lecture 89 Rendering and Exporting a Video File
Lecture 90 Conclusion
Beginner 3D artists looking to create their own animated scenes.