

Blender 4 Essentials: 3D Modeling, Texturing, And Rendering
Blender 4 Essentials: 3D Modeling, Texturing, And Rendering
Last updated 6/2025
MP4 | Video: h264, 1920x1080 | Audio: AAC, 44.1 KHz
Language: English | Size: 9.80 GB | Duration: 14h 37m
Last updated 6/2025
MP4 | Video: h264, 1920x1080 | Audio: AAC, 44.1 KHz
Language: English | Size: 9.80 GB | Duration: 14h 37m
Learn all the essential 3D skills with Blender in under 24 hours, including 3D modeling, UV mapping, and lighting.
What you'll learn
The fundamentals of Blender, including the UI, navigation, and object transformation.
Various 3D modeling techniques.
How to create materials and apply PBR textures.
UV map creation and editing using different techniques.
All available lighting techniques in Blender using the Cycles rendering engine.
Camera creation and manipulation.
In-depth Cycles render settings.
Non-destructive post-processing using the Compositor.
Requirements
A computer capable of running Blender. Preferably, it should have a dedicated RTX graphics card.
Have a standard mouse with a scroll wheel.
A full-size keyboard with a numpad.
Description
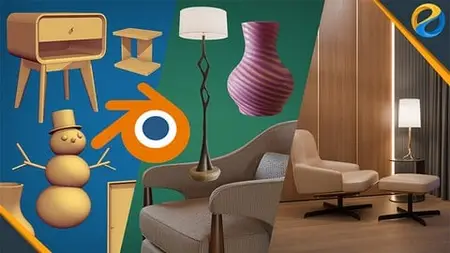
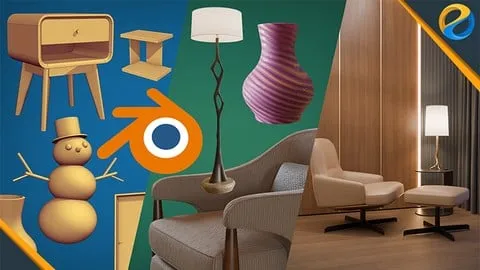
This course was originally 3 courses combined into 1. In the first course, you will learn all the fundamentals of Blender and then move on to 3D modeling techniques. In the second course, you will learn how to use materials, PBR textures, and UV mapping. And, in the third course, you will learn all aspects related to the Cycles rendering engine, including lighting, camera, render settings, and post-processing. I have carefully crafted the curriculum so that students can gain the skills gradually with no friction at all. After this course, in sha Allah, you will be able to create sophisticated 3D models, apply complex textures through UV editing, and be able to optimize Cycles to render high quality images.About the instructorMy name is Widhi Muttaqien, founder of Expose Academy, Expose Studio and Edutalenta. For more than 20 years, I have created thousands of 3D renderings, for architectural, interior, and master plan projects. I have worked with many clients all over the world. I have clients on almost every continent in the world. Besides doing projects, I have also been teaching 3D and computer graphics academically at various schools since the year 2000. In short, I have real-world professional expertise in 3D and teaching experience.The curriculumYou will learn a lot in this course. In short, the course has nine chapters, not including the introduction chapter.In the first chapter, you will learn all the fundamentals of working with Blender, such as the UI, navigation, viewport settings, object creation, selection, and so on. In the second chapter, we will focus on different object transformation techniques, and also the snapping features. In the third chapter, you will learn 3D modeling techniques. These include loop selection, extrude, inset, bevel, bridge, spin, and so on. You will model a lot of 3D objects along the way. By the end of the third chapter you should be able to model a modern curved nightstand product.In the fourth chapter, you will learn all the basics of working with materials in Blender. From assigning and managing materials. Learn some CG fundamentals such as color models and color codes. Learn the differences between "Metal" and "Dielectric" materials. And learn all the features and potentials of the “Principled BSDF” shader. By the end of the chapter, you will have hands-on projects composing materials for a nightstand product and also some architectural objects.Next, in chapter 5, you will learn the fundamentals of shader and texture. You will understand the difference between procedural and image textures, and know how and when to use both. We will then cover PBR textures in detail. At the end of the chapter, you will have hands-on projects where you create texture for a vase model completely procedural. After that, you will create materials for a snowman model, also completely procedural.In chapter 6, you will learn UV mapping in depth. You will learn different techniques of UV mapping and know how to use them and when to use them against different scenarios. You will also learn UV editing such as tweaking, splitting, stitching, UV sculpting, straightening, and so on. By the end of the chapter, you will have 4 hands-on projects. First, you will add a texture to a side table product. Then you will work on the previous nightstand model, but this time with a wood texture. And then you will add textures to this floor lamp 3D model. And finally, you will work on UV mapping a lounge chair product.In the seventh chapter, you will learn how to use various light sources inside Blender. We will start with the world background and the sky texture. Then, you will learn how to use HDR or EXR files. And then learn to use light objects, such as point light, sunlight, spotlight, and area light. You will also learn how to create caustic effects, learn how to make lighting more realistic using IES files, and learn how to make material emit light using the “Emission” shader.Next, in chapter 8, you will learn how to easily set up cameras using different manipulation techniques. Then, you will learn the ins and outs of Cycles render settings such as samples, denoising, clamping, color spaces, view transform, white balance, and so on.In the final chapter, you will learn how to perform post-processing to the rendered result using the “Compositor”. Everything is done non-destructively via nodes. And then, you will learn how to easily isolate pixels for compositing using “Cryptomatte”. Besides the small exercises throughout the course, you will be given a final project at the end. Basically, you will create product renderings of a lounge chair set in 3 different styles. First, with a transparent background but with shadows that can fit into any color or background. Second, with a 3D environment and an evening sky. And third, using the same 3D environment, but now with a day or afternoon sky.So join now and master all the essentials 3D skills using Blender!
Overview
Section 1: Introduction
Lecture 1 Introduction
Lecture 2 Exercise files and conventions
Lecture 3 Vertex, edge, and face
Section 2: Blender fundamentals
Lecture 4 User Interface introduction
Lecture 5 Editors and Areas
Lecture 6 3D viewport navigation
Lecture 7 Orientation Convention and Axis Viewpoints
Lecture 8 The 3D cursor
Lecture 9 Creating and deleting objects
Lecture 10 Object selection basics
Lecture 11 Basic viewport shading modes
Lecture 12 Collection and renaming objects
Lecture 13 Hiding objects and Local View
Section 3: Object transformation
Lecture 14 Transform tools
Lecture 15 Transform parameters
Lecture 16 Transform shortcuts
Lecture 17 Clearing vs Applying
Lecture 18 Active object and pivot point
Lecture 19 Global vs Local
Lecture 20 Duplicating objects
Lecture 21 Project: Cartoon tree
Lecture 22 Add object tools and basic shading
Lecture 23 Project: Snowman
Lecture 24 Installing Extra Mesh Object add-on
Lecture 25 Snap commands
Lecture 26 Snap mode basics
Lecture 27 Snap mode intermediate
Lecture 28 Project: Side table
Lecture 29 Project: Dining table
Section 4: Basic 3D modeling
Lecture 30 Interaction modes
Lecture 31 Basic mesh selection
Lecture 32 Solving the 1 2 3 shortcuts nightmare
Lecture 33 Loop selection
Lecture 34 Basic mesh editing
Lecture 35 Tweak tool, Symmetry, and selection shortcuts
Lecture 36 Face Extrude
Lecture 37 Inset and Bevel
Lecture 38 Loop Cut
Lecture 39 Bridge
Lecture 40 Normal direction
Lecture 41 Project: Modeling a window
Lecture 42 Modeling a door with a knob
Lecture 43 Project: Classic arch
Lecture 44 Point to point modeling basics
Lecture 45 Spin
Lecture 46 Mirror modifier
Lecture 47 Edge Sharp and Edge Bevel Weight
Lecture 48 Project: Modern curved nightstand - Part 1
Lecture 49 Project: Modern curved nightstand - Part 2
Section 5: Material fundamentals
Lecture 50 Creating and assigning materials
Lecture 51 Managing materials
Lecture 52 Color models
Lecture 53 Hexadecimal color code
Lecture 54 Shader basic concepts
Lecture 55 Metallic parameter
Lecture 56 Roughness, Alpha, Transmission, and IOR
Lecture 57 Coat and Sheen
Lecture 58 Specular and Anisotropy
Lecture 59 Emission and Subsurface
Lecture 60 Project: White nightstand
Lecture 61 Project: Wall and window materials
Section 6: Texturing
Lecture 62 Shader Editor basics
Lecture 63 Texture fundamentals
Lecture 64 Image texture basics
Lecture 65 Installing node and UV add-ons
Lecture 66 Assigning PBR textures
Lecture 67 Basic PBR textures
Lecture 68 Displacement texture
Lecture 69 Normal Map
Lecture 70 Alpha texture
Lecture 71 Emission texture
Lecture 72 AO and ARM/ORM textures
Lecture 73 Project: Vase procedural texturing
Lecture 74 Project: Snowman procedural texturing
Section 7: UV Mapping
Lecture 75 Texture mapping basics
Lecture 76 Dynamic projection mapping
Lecture 77 UV projection
Lecture 78 Automatic UV Unwrapping
Lecture 79 Manual UV Unwrapping
Lecture 80 UV editing basics
Lecture 81 Tweaking, Splitting, and Stitching UVs
Lecture 82 Straightening UV maps
Lecture 83 Magic UV add-on
Lecture 84 Project: Side table texturing
Lecture 85 Project: Wooden nightstand
Lecture 86 Project: Floor lamp
Lecture 87 Project: Lounge chair texturing
Section 8: Lighting
Lecture 88 Background and Sky texture
Lecture 89 Environment texture
Lecture 90 Light object types
Lecture 91 Blackbody
Lecture 92 Cycles related light settings
Lecture 93 Caustics
Lecture 94 IES
Lecture 95 Material based lighting
Section 9: Cycles rendering
Lecture 96 Camera creation and transformation
Lecture 97 Resolution and the active camera
Lecture 98 Camera types and settings
Lecture 99 Sampling and Denoising
Lecture 100 Max bounces
Lecture 101 Clamping
Lecture 102 Fast GI approximation
Lecture 103 Film and Performance
Lecture 104 Color Spaces and Display Transform
Lecture 105 Color management basics
Lecture 106 Curves and White Balance
Lecture 107 Image editor and Render Result
Lecture 108 Image file formats
Section 10: Post-production and final projects
Lecture 109 Compositor basics
Lecture 110 Compositing with nodes
Lecture 111 Render passes and Cryptomatte
Lecture 112 Project: Furniture product rendering - Part 1
Lecture 113 Project: Furniture product rendering - Part 2
Lecture 114 Project: Furniture product rendering - Part 3
Students who want to learn 3D skills from the basic level.,Teachers who need to master 3D software to enhance the learning experience with 3D visualization.,Design professionals who need Blender to incorporate 3D elements into their designs.,Hobbyists who need a 3D design tool for 3D printing or other 3D projects.