

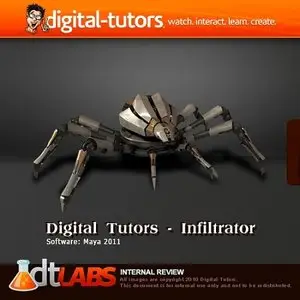
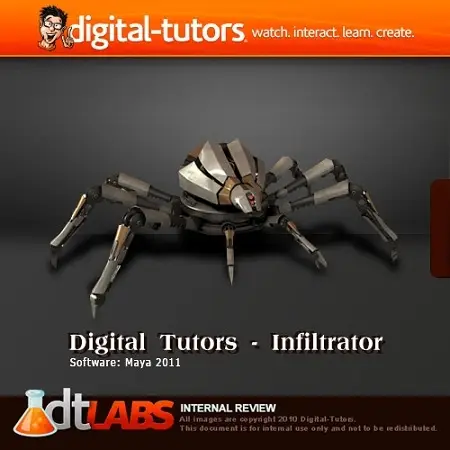
Digital Tutors - Infiltrator Production Pipeline
Digital Tutors - Infiltrator Production Pipeline | 11.5 Gb
English | Video: vp6f, yuv420p, 782x646, 1024 kb/s | Audio: mp3, 44100 Hz, s16
Genre: eLearning
Include:
Volume 1: Concept Design & Storyboarding
Volume 2: Modeling
Volume 3: Rigging
Volume 4: Match Moving
Volume 5: Animation + Project files
Volume 6: Rendering
Volume 7: Compositing in NUKE
In this series of lessons, we'll focus on the concept design and storyboarding section of the 'Infiltrator' production pipeline.
We'll get started by learning how we can quickly generate several rough ideas for our character concept using simple silhouettes. From there, we'll choose our favorite silhouette and begin drawing the rough line work of our character. Once we've finished, we'll begin refining and cleaning up the line work to prepare it for color. Next, we'll learn one method of painting color values onto our character and blending them to create the illusion of a 3 dimensional image. Finally, we'll walk through the storyboarding of a short animated sequence for our character. After completing this course, you will have a good idea of how to create and develop a character for animation. You'll also understand how to go about storyboarding out an animated sequence for a character.
In this series of lessons we're going to build the spider robot for our Infiltrator project.
In this portion of the Infiltrator project we'll use the reference art created in the previous section to construct the character geometry. We'll take the design we've settled on and build it up in Maya using a variety of modeling tools. We'll start out by creating a large library of mechanical pieces that we can use to add detail and fill in open areas at our discretion. Then we'll build the large shell pieces and begin to put it together using our geometry library. We'll also talk about naming and grouping geometry appropriately and reusing geometry to save time. Once done, we'll have the geometry for our Infiltrator robot that we can then rig, animate and integrate into our video.
In this course we will take the crab robot Justin has built and rig it to performance based off of the certain specifications.
We'll construct the control rig with a production focus. In the end, we will not only have worked with the rigging tools in Maya, but we'll also have looked into ways we can use some of those tools creatively to get the job done right and at a faster pace.
In this series of lessons we'll learn how to use MatchMover to track some real-life footage and create a 3D scene that matches the real camera's movement. Match moving is an essential step for integrating 3D into real footage.
We'll begin this project by examining the footage and seeing what processes have been already done. From there, we will enter camera data from the shoot and manually track the shot. Once we have a solid camera solve using manual tracking, we will use the automatic tracker to create many 3D points for us. Then we'll finish the match move by manually tracking key areas and creating a coordinate system. Once we move to Maya, we'll create some stand-in geometry and render a preview of the match move. This series of lessons will show how to use MatchMover's powerful manual tracking features to solve a difficult shot and finish prepping the file before handing it off to the next person in the pipeline. This will allow us to animate on top of geometry that is very close to the real world for increased realism and ease of use. All footage that needs 3D integration will need to be match moved, so this is a very important part of the production pipeline.
In this course we will take the rigged Infiltrator and bring it to life with animation.
We'll animate the Infiltrator with a production focus, using storyboards and an animatic to assist us in making sure our animation adheres to specific instructions. We'll get into character development and learn how to go about creating performances that are convincing and, at the same time, entertaining. We'll even do a little rigging and learn how to work with Maya's robust and very efficient Referencing system to update the control rig and, in turn, automatically have those changes update in our animation file saving us plenty of time.
In this volume of the Infiltrator Production Pileline, we will go through the process of setting up materials, lights and render passes in preparation for final compositing.
We will begin by learning how we can optimize our high-resolution geometry to use our system memory more effectively. This will allow for more efficient, stable rendering, especially if you are working on a 32-bit system with limited resources. From there, we will take some time to set up materials for the various portions of our 'Infiltrator' spider and then we will begin the lighting setup. We will use an image-based-lighting approach to achieve a high level of realism and to ensure that the lighting on the CG spider matches the live-action plate. Finally, we will learn how to use Render Passes and Render Layers to output our final renders in a way that will give us a tremendous amount of control over the final result whenever we get into our final compositing phase.
In this series of lessons we will learn how to use NUKE to re-assemble our Maya render passes, integrate them with our background plates and add some special effects. Using NUKE to composite gives us an incredible amount of creative control over the final look of our shot.
We will begin this project by importing and formatting our render passes from Maya. From there we will do some basic compositing. We will then begin troubleshooting our shot and using a variety of tools and techniques to integrate our elements. We will also learn how to fix issues in our background plate using masks, keyers and other nodes. During this shot, we will be animating various elements to tell the story of the director. Finally, we will complete the project by using distortion and blurs to create an ending for our infiltrator shot.