

Create Captain America'S Motorcycle With Blender

Create Captain America'S Motorcycle With Blender
Last updated 3/2019
MP4 | Video: h264, 1280x720 | Audio: AAC, 44.1 KHz
Language: English | Size: 3.13 GB | Duration: 8h 30m
Last updated 3/2019
MP4 | Video: h264, 1280x720 | Audio: AAC, 44.1 KHz
Language: English | Size: 3.13 GB | Duration: 8h 30m
Learn hard surface modeling in Blender, how to manage a complex project, and how to light and render a scene.
What you'll learn
Create complex models in Blender
UV map and texture 3d objects
Light and render realistic scenes using Blender's Cycles render engine
Requirements
You should understand how to navigate in the Blender interface and be familiar with basic modeling tools like Extrude and Loop Cut.
Description
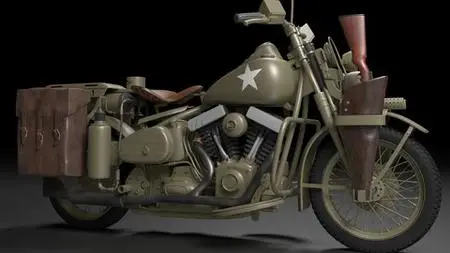
Learn the fundamental concepts and techniques of hard surface modeling in Blender. Learn to create materials and textures, as well as light and render a realistic vehicle in Blender.Build a strong foundation in 3D Modeling so you can create your own amazing vehicles.Blender Modeling ToolsStrategies for Complex ProjectsMaterials and Textures in BlenderBlender Cycles Lights and RenderingLearn 3D Modeling for RealismLearning to create realistic 3D models opens the door for you to create your own incredible animations and visual effects. Blender is free to download and use for any purpose and has proven itself to be a powerful tool for independent and commercial projects all over the world.Blender provides an excellent low-cost way to learn the fundamentals of 3D modeling, texturing, and rendering. Since 1995, it has been growing in features and usage in the animation and visual effects industry.Content and OverviewIn this course you’ll create Captain America’s motorcycle from the 2011 movie, “Captain America: The First Avenger.” Throughout the course you’ll learn about the Blender modeling, texturing, and rendering tools. You’ll learn the techniques and strategies needed to tackle complex projects so you can bring your own ideas to life.We’ll begin by creating reference images in Adobe Photoshop. Then you’ll learn how to set-up reference images in Blender to make your modeling projects easier and more efficient. You will learn how to use the Blender modeling tools to create realistic hard surface models as we create each part of the motorcycle. You will use modifiers, booleans, and path tools, while creating the motorcycle’s engine, tire treads, and frame.When the modeling is complete you will learn how to set-up materials in Blender for the motorcycle, create uv maps of selected 3D objects, and apply realistic textures. In the end, you will light the motorcycle and use the Blender Cycles render engine to render the scene.Students completing this course will have the knowledge they need to create the high quality, realistic 3D models needed for animations and visual effects.Reference images and textures are available to download with their corresponding videos."I love your tutorials! For the first time, I'm able to understand Blender! Thank you so much!" -Jade W"Great work, Darrin. You make a great teacher as well as a fantastic
3D artist. I really appreciate your work; can't wait to see what you do
next! -theLegendofSamuel"I just wanted to say how much I appreciate these high quality
tutorials you put out!!! You are truly an inspirational person. -Zach B
Overview
Section 1: Introduction
Lecture 1 Introduction
Section 2: Modeling
Lecture 2 Reference Images
Lecture 3 Starting the Frame
Lecture 4 Continuing the Frame
Lecture 5 Assembling the Frame
Lecture 6 Finishing the Frame
Lecture 7 Building the Rear Brace
Lecture 8 Starting the Tires
Lecture 9 Modeling the Front Fender
Lecture 10 Creating the Rear Fender
Lecture 11 Modeling the Gas Tank
Lecture 12 Creating the Seat
Lecture 13 Building the Front Fork
Lecture 14 Using Paths for the Handle Bars
Lecture 15 Modeling the Rear Cannisters
Lecture 16 Creating the Flame Thrower
Lecture 17 Modeling the Rear Lights
Lecture 18 Building the Rear Rack
Lecture 19 Using Booleans to Finish the Rack
Lecture 20 Beginning the Engine
Lecture 21 Circular Extrusions from Square Polygons
Lecture 22 Continuing the Engine
Lecture 23 Modeling the Engine Heads
Lecture 24 Creating the Tubes with Paths
Lecture 25 Adding Details to the Engine
Lecture 26 Modeling the Rocker Covers
Lecture 27 Using Groups in Blender
Lecture 28 Modeling the Exhaust Pipes
Lecture 29 Finishing the Exhaust Pipes
Lecture 30 Building out the Engine
Lecture 31 Using the Bevel Tool
Lecture 32 Building Complex Shapes
Lecture 33 The Solidify Modifier and Booleans
Lecture 34 Adding Details to the Left Side
Lecture 35 Connecting Objects with the Path Tool
Lecture 36 Beginning the Transmission Cover
Lecture 37 Continuing the Transmission
Lecture 38 Using Booleans to Finish the Transmission
Lecture 39 Adding Details with Paths and Solidify
Lecture 40 Adding Geometry to Paths
Lecture 41 More Tubes with Paths
Lecture 42 Modeling the Headlight
Lecture 43 Creating Coils and Springs
Lecture 44 Using the Array Modifier for Spokes
Lecture 45 Creating Tire Treads
Lecture 46 Sculpting the Leather Saddlebag
Section 3: Materials and Textures
Lecture 47 Creating Base Materials
Lecture 48 Adding Multiple Materials per Object
Lecture 49 UV Mapping
Lecture 50 Adding Image Textures
Lecture 51 Finishing the Textures
Anyone who is interested in learning hard surface modeling in Blender, as well as setting up Cycles materials, texturing, and rendering.