

Blender 2.8: Create Photorealistic Materials Procedurally

Blender 2.8: Create Photorealistic Materials Procedurally
Last updated 10/2019
MP4 | Video: h264, 1280x720 | Audio: AAC, 44.1 KHz
Language: English | Size: 3.39 GB | Duration: 3h 46m
Last updated 10/2019
MP4 | Video: h264, 1280x720 | Audio: AAC, 44.1 KHz
Language: English | Size: 3.39 GB | Duration: 3h 46m
Learn how to use blenders material node editor to create photorealistic materials procedurally
What you'll learn
learn how to use material nodes in blender
learn how to create photorealistic pbr materials procedurally using material nodes
learn about blending modes such as mix, screen, multiply, add etc.
learn about the importance of texture coordinates and how they apply to procedural materials
At the end of the course students have a much deeper understanding of how procedural textures in blender work
Requirements
blender 2.8
Description
Learn how to create photorealistic pbr materials in the node editor procedurally. Procedural textures are extremely useful because unlike image based textures procedural textures can be configured in a lot of ways, they don't have limited resolution and they can be customized to your preference. This course will teach you everything you need to know when creating procedural materials using a pbr workflow.Everything in the course is organized into individual sections with a step-by-step approach to the techniques I used. All of the project files created in the course are included in the project files in the last section of the course. This course has lots of information and at the end of the course you will be able to create highly detailed procedural materials with ease.
Overview
Section 1: differences between cycles and eevee
Lecture 1 what is a shader?
Lecture 2 differences between cycles and eevee
Section 2: introduction to texture coordinates
Lecture 3 advantages of procedural textures
Lecture 4 understanding texture coordinates
Lecture 5 explanation of the uv coordinate system
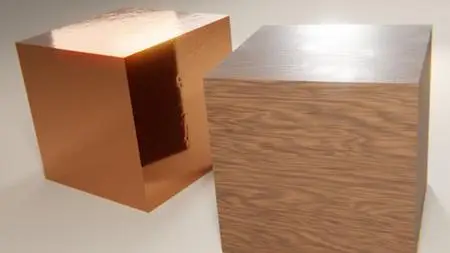
Section 3: creating a dented copper procedural texture
Lecture 6 creating a basic procedural material
Lecture 7 creating smudges and grunge procedurally
Lecture 8 using mix nodes to define where our grunge and smudge texture appears
Lecture 9 distorting texture coordinates with noise
Lecture 10 creating normal map textures procedurally to add photorealism
Section 4: creating a wood procedural material
Lecture 11 creating wood diffuse texture procedurally
Lecture 12 creating procedural roughness map
Lecture 13 adding oak wood rays procedurally
Lecture 14 creating bumps and scratches with procedural normal maps
Lecture 15 tweaking procedural normal map
Lecture 16 controlling placement of roughness map procedurally
Lecture 17 creating normal map texture for end grain and finalizing our wood texture
Section 5: explaning the pbr workflow and how color blend modes work
Lecture 18 explanation of pbr workflow
Lecture 19 exploring color blend modes in the node editor part 1
Lecture 20 exploring color blend modes in the node editor part 2
Lecture 21 exploring default procedural materials in blender and important things to know
Lecture 22 exploring default procedural materials in blender part 2
Section 6: concluding the course
Lecture 23 learning about vector curves, concluding the course and project files
blender users who are interested in learning about how nodes work,blender users who want to create photorealistic materials procedurally without requiring image textures