

Advanced Arduino Boards And Tools
Advanced Arduino Boards And Tools
Last updated 10/2019
MP4 | Video: h264, 1280x720 | Audio: AAC, 44.1 KHz
Language: English | Size: 5.00 GB | Duration: 9h 24m
Last updated 10/2019
MP4 | Video: h264, 1280x720 | Audio: AAC, 44.1 KHz
Language: English | Size: 5.00 GB | Duration: 9h 24m
A tour of advanced Arduinos boards, and the tools that will supercharge your projects
What you'll learn
Select the right Arduino board for your next project
Learn about debugging and relevant tools
Create Internet of Things applications using Arduino and Temboo
Use Processing to create desktop applications that interface with the Arduino
Use OpenOCD and GDB to debug a sketch running on an Arduino Zero
Use Atmel-ICE and Atmel Studio to program and debug Arduino sketches
Appreciate the differences between advanced Arduino boards
Requirements
A basic working knowledge of the Arduino Uno is required.
Having at least some of the boards and tools described in this course is optional. You can take the course first, and then decide which board to purchase for your next project
All of the software tools presented in this course are free.
Description
In Advanced Arduino Boards and Tools, I take you on a tour of some of the best technology that the Arduino ecosystem has to offer. This course will contain more than 8 hours of video, presented in over 50 lectures.
The Arduino Uno is awesome: rugged, easy to use, low cost, configurable, open source. But sooner or later, you will feel that it is not enough for your projects. Not enough inputs and outputs. Not enough speed. Not enough memory. Not enough communications options. The list goes on.
The Arduino ecosystem has you covered. There are more powerful alternatives to the Arduino Uno. You can leverage your existing equipment and components, and especially the time and effort investment that you have made to the Arduino, and adopt a more powerful and specialised Arduinos for your next project.
In this course, I present some of the best currently available advanced Arduino boards. I try to help you understand what is special about each one, how you can use them in your projects, and what to look out for when you migrate from the Arduino Uno.
Of course, advanced Arduino projects depend on software, as well as on hardware. Advanced projects need advanced tools! In this course, I also have this covered. Learn about advanced debugging and editing tools, cloud-based automation, and Arduino-PC collaboration.
In this course, I cover these advanced Arduino boards:
Arduino Mega 2560Arduino DueArduino 101Arduino ZeroArduino Galileo Gen 2
For each board, I discuss the features that distinguish them apart from other Arduino (their "special powers"). I demonstrate these features through experimentation.
I also cover these tools:
Atmega Studio, an advanced editor and debuggerAtmega Atmel-ICE, a debugger and programmer deviceTemboo, a cloud automation platform for the Internet of ThingsProcessing, a language and framework for creating desktop applications that inter-operate with the Arduino
All demo sketches are available for download from Github, so you will not need to do much typing.
To make the most of this course, you should already have some working experience with a basic Arduino board, like the Uno. If you are just starting now, I suggest that you consider enrolling to Arduino Step by Step, and working through the project in Beginning Arduino.
You do not need to own one of these boards to take advantage of the materials in this course. You can use this course as a reference guide to understanding each board's benefits and disadvantages before you choose one for your next project.
Start learning about Advanced Arduino Boards and Tools now!
Overview
Section 1: Introduction
Lecture 1 What is this course about
Lecture 2 A summary of the course content
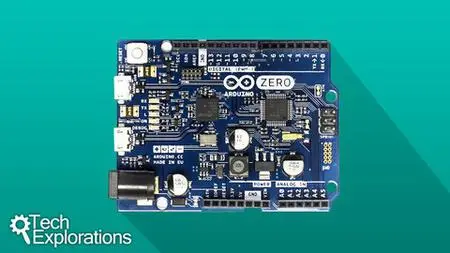
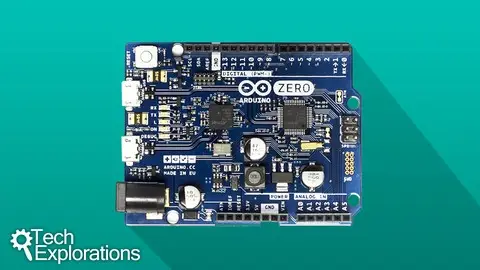
Section 2: The Arduino Zero
Lecture 3 Introduction
Lecture 4 The Arduino Zero - An introduction
Lecture 5 Setup
Lecture 6 Arduino Zero and PWM
Lecture 7 Digital to Analog conversion: make a triangular waveform
Lecture 8 More waveforms
Lecture 9 Arduino Zero and power consumption
Lecture 10 The Real Time Counter
Lecture 11 Playing with the USB Native port
Lecture 12 Conclusion
Section 3: The Arduino 101
Lecture 13 Introduction
Lecture 14 Introducing the Arduino 101
Lecture 15 Setup and the Real Time Counter demo
Lecture 16 Bluetooth Low Energy and LED control demo
Lecture 17 Bluetooth Low Energy and the Heart Rate service demo
Lecture 18 Inertial Measurement Unit and Processing demo
Lecture 19 Conclusion
Section 4: Arduino Mega 2560
Lecture 20 Introduction
Lecture 21 Introduction to the Arduino Mega 2560
Lecture 22 Using an Uno-style shield with the Mega 2560
Lecture 23 Looking at the Mega 2560 multiple serial ports
Lecture 24 Restoring the bootloader with the Atmel-ICE programmer
Lecture 25 Conclusion
Section 5: Arduino Due
Lecture 26 Introduction
Lecture 27 Introduction to the Arduino Due
Lecture 28 Playing with the native USB port and the mouse library
Lecture 29 Using an Uno-style shield with the Due
Lecture 30 Looking at the Due's dual Digital to Analog outputs
Lecture 31 Power consumptions: comparing the Due against the Mega 2560
Lecture 32 Debugging on the Due with the Atmel-ICE debugger
Lecture 33 Conclusion
Section 6: Arduino Galileo Gen 2
Lecture 34 Introduction
Lecture 35 An introduction to Galileo Gen 2.
Lecture 36 Setup and first boot for Galileo Gen 2
Lecture 37 Setting up the full Yocto Linux on the Galileo
Lecture 38 Using the Ethernet port
Lecture 39 Using the SD card module
Lecture 40 Using the Wifi mPCI module
Lecture 41 Accessing the GPIOs from Linux
Lecture 42 Using an I2C LCD screen with the Galileo Gen 2
Lecture 43 Using an SPI color OLED display with the Galileo Gen 2
Lecture 44 Conclusion
Section 7: Atmel Studio and debugging
Lecture 45 Introduction
Lecture 46 Introduction to Atmel Studio
Lecture 47 Installing Atmel Studio
Lecture 48 A demonstration of debugging in Atmel Studio, Part 1
Lecture 49 A demonstration of debugging in Atmel Studio, Part 2
Lecture 50 How to restore the bootloader overwritten by Atmel Studio
Lecture 51 Conclusion
Section 8: Playing with Temboo
Lecture 52 Introduction
Lecture 53 What is Temboo?
Lecture 54 Creating your first Choreo: setup Google Spreadsheets
Lecture 55 Creating your first Choreo: configure and upload
Lecture 56 Create an email Choreo
Lecture 57 Combine Choreos for practical workflows
Lecture 58 Choreos and output triggers
Lecture 59 Conclusion
Section 9: Processing
Lecture 60 Introduction
Lecture 61 About Processing
Lecture 62 Setup, quick demo, and resources
Lecture 63 Processing, Firmata and Arduino
Lecture 64 Visualise sensor data from an Arduino 101
Lecture 65 Conclusion
Section 10: Debugging with OpenOCD and GDB
Lecture 66 Introduction
Lecture 67 OpenOCD and GDB: An introduction
Lecture 68 Setting up and starting OpenOCD and GDB
Lecture 69 A debugging session demonstration
Lecture 70 Conclusion
Section 11: Conclusion
Lecture 71 Conclusion
Lecture 72 Bonus Lecture
This course will benefit the most students who already have at least a basic working experience with the Arduino Uno,Students who are looking to upgrade from the Arduino Uno, but don't know which board option is best for their next project,Students who are curious about Internet of Things platforms, like Temboo,Students who are curious about the tools used in more complicated Arduino projects, like editors and debuggers,If you have never worked with the Arduino before, it would be best if you took one of my beginner Arduino courses first